B&W Mask Wow! What a can of worms I opened up when I first showed this example of how to make a button using the Lighting Effects filter! There's two ways to do this, the easy way, (for Macintosh only), and the hard way.

You'll want to know how to do this the hard way, even if you have a Mac, because this opens up things for some other cool effects.

Sample Image


First, the easy way. There's a shareware filter by Kas Thomas called "Frame". It allows you to take a rectangular selection, and either darken or lighten it by a certain number of pixels, either as a gradient or as a solid bar. This filter does this one simple thing, and does it really well. The filter, available only for the Macintosh, will show up in the "other" category on your filter menu. It only costs $5 to register, and the downloadable version is not crippled in any way.

What *I* want to know is this, "Kas Thomas, where are you?" I sent $20 to the address in the documentation, and it came back as 'no such address'. If you read this, drop me a note, you deserve the $$$. ANYways, here's a screen capture of the dialog box from when I made that mask above...


There's some interesting things you can do with this filter. I have an Applescript set up that will run this filter multiple times, adjusting the brightness as a gradient, by -32 each time. First I do it at 12 pixels, then 8, then 4, 2, and finally 1 pixel. This gives the illusion that it has a rounded edge, making it look like a plaque. Add a dropshadow to this, and you have an interesting way to insert an image to your page. It's practically a no-brainer, I run this effect on all of my thumbnails, it's quick and easy.


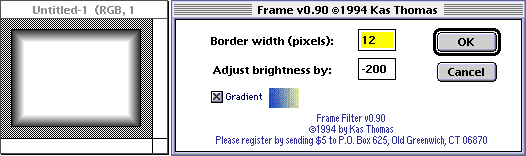
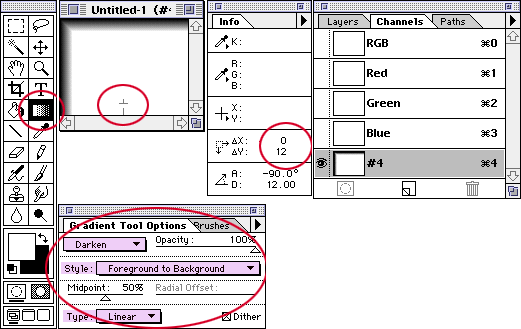
Okie-doke, looks like it's time to describe the hard way. There's an another way to do this that's also easy, but I'll describe it later on, this method is neccessary for a lot of my other effects. We're going to be using our "Gradient Tool" on this one. Make sure your foreground is white, and your background is black. Create a new channel to work on, fill it with white, and we're ready to go.

Set your gradient tool to "Darken", "Foreground to Background", and "Linear". Leave the midpoint at 50%, and the opacity at 100%. You can play with these settings if you want, and get some interesting effects, but leave it there for now.

Our "Info" pallette is critical for this effect, we'll need to watch it closely to make sure we don't drift when we make our mouse clicks. To start, click 12 pixels down on the image, and drag *upwards* 12 pixels to the edge. The info pallette will always read 12,0 or 0,12 (+/-). If you drift to the side, the angle will be way off. Repeat this on each edge, and you'll get those nice sharp edges at the corners. You can do something similar to this with a wide blur, but that won't give you those nice corners.


Well, I promised you some neat tricks with this, didn't I? Ah well, if not, here's the cool trick anyway. Here's another use for the Gradient tool. Starting with a black background, and a foreground color of white, set the gradient tool to "lighten", "Foreground to Background", and "Radial". Click & drag, and you'll get a cicular gradation. The magic starts when they intersect, instant molecules! You can have tons of fun with this effect, it seems to work best against a dark background, but by all means play around with it. Enjoy!


I said there was another easy way to do this maks, so here it is. This one was passed on to me by "Westerlund", or "PiX", from Sweden. He claims to still be new to the program, and this only proves my point that there's *always* 3 different ways to do any effect. Here goes...

Take your image, and fill it with white, and set your 'foreground' color to black. Select "all", and then choose "select/modify/border", at 12 pixels (this is the width of your slant). Fill it with black, and there it is!

Please don't hate me for making you go through the 'gradient tool' method, you really will need it for a lot of other masks, but this is a quick way to get the square button mask.


Entire contents copyright ©1994-98 by Doctor Thaddeus Ozone, all rights reserved.