
by Tom Nelson
Here's a procedure to make very realistic lightning. Start with a new file
which you've filled with black, or a new layer which is transparent. You
probably want to set up your Commands pallette for the commands "New Path,"
"Stroke Path," and "Turn Off Path." You'll be using those commands a lot.
1. Use the lasso to draw a long jagged line where you want the main
lightning bolt to go. It's *easy* to make an irregular line with the lasso;
just jiggle your hand a bit. Don't let go of the mouse button when you get
to the end. Instead, drag at right angles to your line and then let go. The
reason is immediately obvious: Photoshop draws a line back to your starting
point to close the selection. If you don't drag away from the line you
want, the resulting long, thin selection has gaps in the middle. If this is
confusing, just try it.
2. In the Paths pallette choose Make Path, or use the Commands pallette to
do the same thing. Your lasso selection becomes "Work Path" in the Paths
pallette. Photoshop prompts you for a tolerance setting - 1 pixel is good
enough.
3. With the minus-pen tool (the pen tip with a "-" next to it), click on
the *unwanted* line, near one of the ends. Hit the Delete key to delete it.
This selects all the other points, unfortunately. If you hit Delete again,
you delete the whole path. Instead, click away from the path to deselect
it. Then click on the unwanted segment near the other end of your path and
delete that too. You now have two paths, the lightning bolt and a separate
unwanted path. Click again anywhere on the unwanted path and hit Delete
*twice.* The first time deletes part of the path, the second time deletes
the rest of it. You now have a path of the main lightning bolt. Choose
"Save Path" and name your path "Main Bolt" or something.
4. I haven't figured out how to make a forked path. You need to repeat the
above procedure for all of the major branches of your lightning bolt. Use
the lasso, then Make Path, then delete the unwanted part, then Save Path.
The minor branches should come off the main bolt at a place where the main
bolt changes direction abruptly, and should not come as far to the ground
as the main bolt. This is the way it happens in nature. Don't worry about
making all the little sparks that will come off the lightning bolt. Just
make 3-6 main branches.
5. Now the fun starts. Set up your foreground and background colors as
fairly dark colors. I used shades of purple with about 55% brightness.
Double-click the airbrush tool to get the options pallette. Set 50%
pressure, click the "fade" checkbox and set about 200 steps to background
color. When you stroke the path with the airbrush tool, and the color will
go from foreground to background, darkening as it descends. The effect is
very cool. I set the airbrush to 8 pixels and 0% hardness, but your own
settings will depend on the size of your picture.
6. Click on the main bolt in the Paths pallette to make it active. In the
Paths pallette or the Commands pallette, choose "Stroke Path" to stroke
with the airbrush. You may want to "Turn Off Path" (or select another path)
to see what it looks like.
7. Repeat the stroking process with the other branches, making them
narrower (smaller airbrush) the shorter they are. Because they take off
from the main bolt, and the main bolt changes color as it goes, you'll need
to change the foreground color for each smaller branch. While you're at it,
darken the background color as well. The smaller bolts are cooler in
temperature and thus darker. You'll probably want to reduce the number of
fade steps in the Airbrush Options pallette. Stroking the branches is
easier to do than to discribe.
8. Go back to your main bolt, reset your foreground and background colors
to the original ones you used, then *lighten* those colors by clicking each
swatch and dialing up the lightness in the Picker pallette. I used about
80% brightness for the second stroke.
9. Set a considerably smaller brush size for the airbrush (I used 3 pixels,
0% hardness). Stroke the main bolt again with the lighter colors, then do
the same for the other branches.
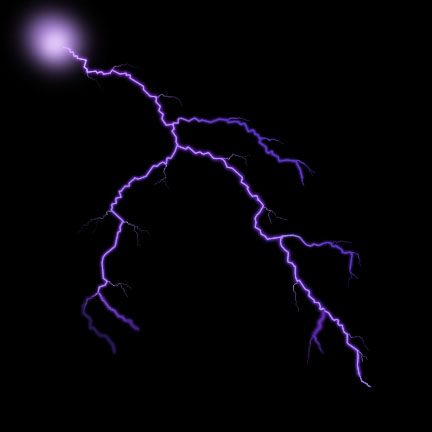
10. Set the colors to white or a very light color (I used 95%) for the
final stroking. Stroke only the main bolt, or also the most major of the
branches. The lightning takes on a look of reality.
11. The final step is to pull "sparks" off the lightning with the smudge
tool set to 90-95% and a small brush setting. click on a part where the
bolt changes direction, hold down the mouse button and pull off a jaggy
line. You can also pull the main lightning bolt color down into the
branches a ways if you like. Your lightning bolt is done.